
There’s something beautifully chaotic about vlog footage. One minute, you’re sipping an iced latte; the next, you’re unboxing skincare, and somehow, you end the day talking to your cat under fairy lights. GRWMs, shopping hauls, and daily diaries are beloved because they’re real—but real doesn’t mean rough.
If you’ve ever sat on thirty minutes of vlog content wondering, how do I even start making sense of this?—you’re not alone. Editing lifestyle footage is where art meets organization, and with an AI video editor like Pippit, the process becomes both smarter and smoother.
Framing The Flow: Your Vlog Is A Story, Not Just Scenes
The golden rule? Every vlog, no matter how casual, needs a clear arc. Linkhouse: Even if you’re just showing what you bought at the mall, viewers want to follow a thread—anticipation, reveal, and a touch of personality-driven commentary.
Map your footage to match these storytelling beats:
- Intro with energy: Even casual “hey guys” moments should set the tone fast. Show a quick preview of what’s coming—like your favorite haul item or a chaotic fitting room moment.
- Organized segments: Instead of one endless shopping monologue, break it into themed chunks—makeup, outfits, accessories. Use subtle transitions to separate each section.
- Mini-peaks and payoffs: Build moments of excitement with unexpected finds, funny commentary, or audience questions (“Would you wear this?”).
- Strong outro: Wrap with a quick sign-off, product recap, or teaser for tomorrow’s vlog. Keep the ending clean and purposeful.
Your vlog doesn’t need to be scripted—but it does need rhythm. The right cuts give even the messiest content a heartbeat.
From Dump To Digestible: Trimming Without Killing The Vibe
Let’s talk length. In an era of Reels and Shorts, even long-form creators need to be strategic. That doesn’t mean turning your 12-minute vlog into a 2-minute montage—but it does mean every minute has to earn its keep.
How to make every second matter:
Cut the “umms” and “wait, hold on.” Viewers love authenticity—but no hesitation.
- Speed up low-motion tasks: Fast-forward through mirror checks, checkout lines, or repetitive transitions.
- Keep reactions, ditch repetition: That second haul clip of you holding up another white tank top? One was enough.
- Slice between scenes: Insert a quick B-roll—like walking shots, street signs, or coffee pours—to create breath between big segments.
Minimalism in editing doesn’t mean being boring. It means being deliberate. Let your personality breathe, but don’t let your footage ramble.
Pacing Matters: The Jump Cut Advantage
Enter the jump cut. It’s not sloppy. It’s strategic, especially in lifestyle vlogs, where energy matters more than cinematic smoothness.
Jump cuts let you:
- Keep the momentum: Eliminate dead air and repetitive phrases while maintaining narrative flow.
- Highlight your humor: Quickly switch between reactions or facial expressions for comedic effect.
- Enhance relatability: Audiences expect jump cuts now—they’ve become part of the visual language of modern creators.
Pair your jump cuts with upbeat background music and on-screen captions, and your vlog starts to feel like a perfectly edited highlight reel—not a raw data dump.
Sequencing Chaos With The Right Tools
All this talk about trimming and jumping—how do you actually do it without losing your mind? This is where a video splitter comes in. Instead of editing one giant video block, splitting your footage into scenes gives you complete control over structure, pacing, and transitions.
Whether you’re working with two clips or twenty, a video splitter helps transform raw chaos into editable order. And when you’re working inside Pippit, splitting is not just fast—it’s smart.
Let’s walk through how to turn long footage into scroll-stopping content using Pippit’s intuitive scene-splitting flow.
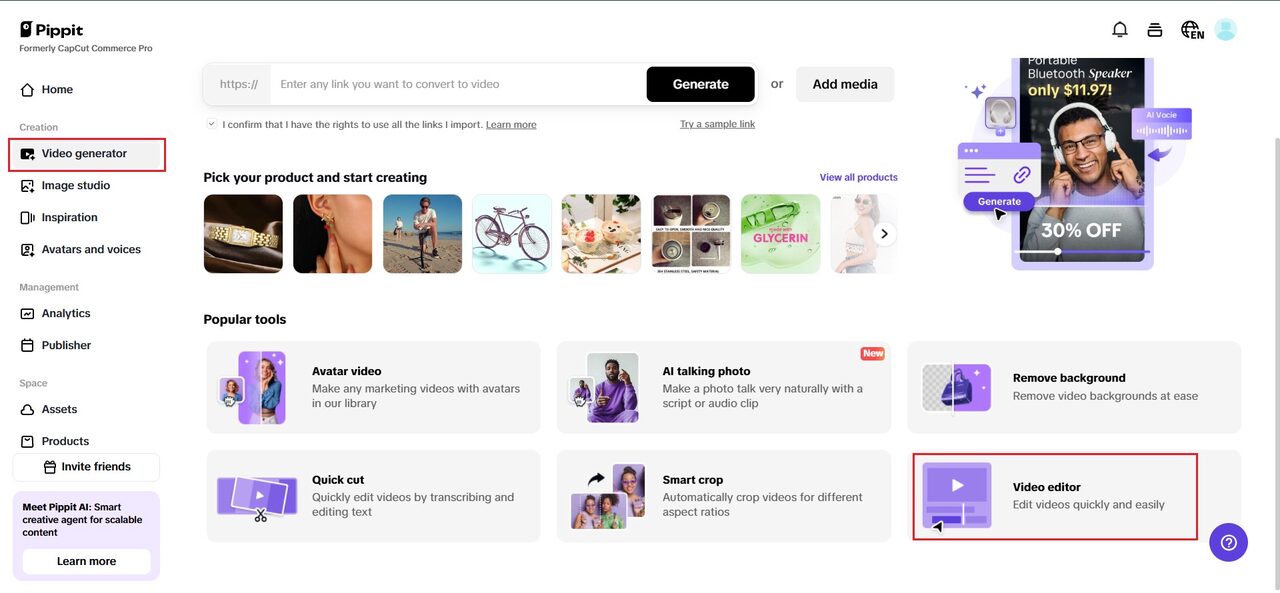
Step 1: Launch The Video Editor
To get started, launch Pippit and choose the “Video editor” option from the “Video generator” screen. You may upload the video you wish to modify by browsing your device or by dragging and dropping your video file into the timeline. With this configuration, you can easily access your video and get it ready for splitting.
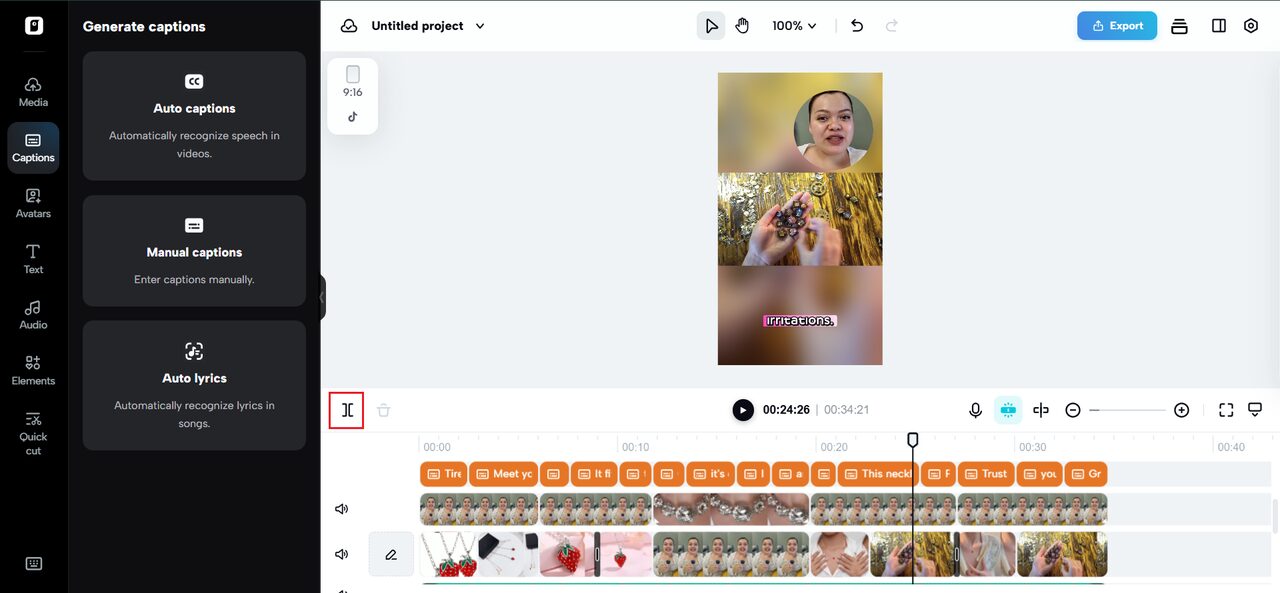
Step 2: Divide Scenes And Videos
Click the split scene icon after moving the timeline cursor to the correct split point to separate your movie into scenes. Additionally, you may utilize the “Split scene” option to automatically identify and divide your video at each scene change, which makes precisely separating clips easy.
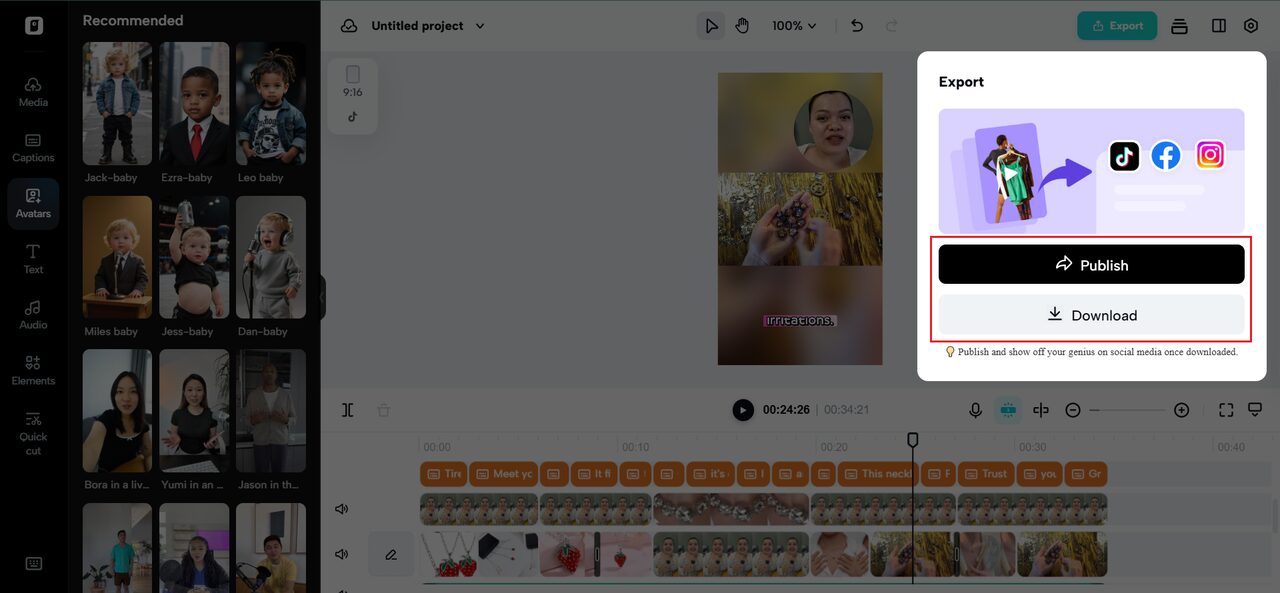
Step 3: Download And Share
After dividing your movie, you may quickly export the parts you want in the format of your choice. Adjust your export parameters to suit certain platform specifications or personal preferences for the best results.
Where Split Vlogs Shine The Most
Not all videos benefit from tight cuts, but lifestyle edits? Absolutely.
These formats are made for snappy storytelling:
- GRWM (Get Ready With Me): Cut between makeup steps, outfit tries, and voiceover commentary to keep pace snappy and engaging.
- Shopping hauls: Split haul categories by brand or type. Include reaction clips or quick try-ons to keep the energy visual.
- “Spend the Day With Me” vlogs: Don’t just show—build scenes with structure. Use a mix of voiceover, time stamps, and fast cuts to simulate flow.
Split scenes = better pacing = more engagement = more retention.
Vlog Smarter, Not Harder—With Pippit
There’s no magic formula for the perfect vlog. But there is a smarter way to edit one. And it starts with turning chaos into cohesion—one scene at a time.
Whether you’re trimming a 25-minute haul into a tight, exciting 7-minute video or turning a lazy Sunday vlog into something binge-worthy, Pippit makes editing easier, cleaner, and more creative. Built with creators in mind, it gives you precision control, intuitive tools, and freedom to edit without frustration.
Don’t let great footage go to waste. Use Pippit to split, trim, and polish your content—then hit publish with confidence.